I know I have trouble keeping up on updates so I thought I would pass this on:
Camera Raw update v4.4.1 and Adobe Photoshop Lightroom 1.4.1 update
Look under "Latest Updates"
Camera raw updates were mostly for added camera support but there were a few changes.
Tuesday, April 29, 2008
Adobe updates....
Sunday, April 27, 2008
Actions.....
So before I begin a few thoughts: I have been disorganized and unsure of my content to add to my blog. I hope to find some continuity at some point. Side note: I am learning Photoshop Lightroom; it’s been a slow process, but will begin to share my experiences on that as well.
So step by step:
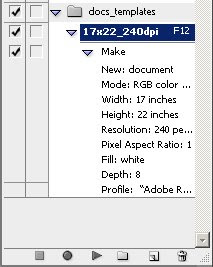
1> open up the actions panel(pc, alt+f9) or click on action tab
 Create the document and name that you use the most often, in my case: "17x22_240dpi." I also recommend keeping the name short so when you are looking for it on the action panel you don't have to widen the panel, that will slow things down a bit. Make sure the "set:" is using the folder we just made.
 so be careful because most of your steps will be recorded. You can always stop and start and always delete steps that you don't want, so you don't have to start over if you screw up.
 Put in all the pertinent information. I usually use 8bit because when sending images to press it uses 8bit not 16bit, and once I've done all my adjustments there is no reason to keep it at 16bit at least for now (I do have the original file at 16 bit so in the future when printers can get better I can still print at the better quality. MAKE sure that you open up the Advance options and the color profile is set to what you want, in my case Adobe RGB(1998). I still use Adobe RGB(1998) because ProPhoto RGB is such a large gamut and I still have to output alot to SRGB. When I go from ProPhoto RGB to SRGB I have recolor correct my images (try it, you'll see for yourself). After all that click "ok"
7> Don't forget you are still live! So press stop!

Woo Hoo, all done! If you expand the action you can see what it does when the action runs

Lets test it, press f12
So we can take this a step further for more practical use album design. Oops out of time, until next week....
Monday, April 21, 2008
Vector masks and few thoughts on printers
Please email me if you have any photoshop or Epson questions. I will post the answers the following week. paul@weinrauchphotography.com
Photoshop tip(these are PC, I will add the MAC shortcuts soon):
Filling a layer mask. I have found several ways of doing this.
1. shift f5> and changing the "use:" to black, white, 50% gray, etc...
but then I found a quicker way when just using black to hide... DUH!
2. After you add the vector mask if you press ctrl-I it will invert it the color (so if it is white it will turn black, black to white)
but then even quicker....
3. hold down alt and click on add vector mask and it will automatically be in black
and another way after you add the vector mask
4. pressing the keys alt + del will add whatever color your foreground color is.
Epson printer tips:
1. Always do a nozzle check, everyweek. My epson 4800 may go 3-4 weeks, sometimes more, without having an image printed in it. I have found that by doing a nozzle check every week my printers are less likely to get clogged and very rarely get a really bad clog. And when my epson 4800 gets clogged severly it may cost me $15-30 in ink everytime.
2. Should you leave your printer on all the time? This isn't an easy answer. It depends on your printer and what model. I own an Epson 3800 and an Epson 4800. I have found through trial and error that my heads clog on my Epson 4800 clog more when I keep it on and my 3800 clogs less when I leave it on. A forum that I am part of goes both ways on this question. So start paying attention to your printer.
3. Spray your print!!!! I use Hahnemule protective spray. Test it yourself. I sprayed a print after 24 hours, then let it stand for an hour and then.... I tried to destroy it. I put it under water, until it was soaked, and then tried to smudge it with my fingers. I let it dry and it looked nearly perfect.
Until next week!!!
Monday, April 14, 2008
Where's my voice....
So this weekend I had my first opportunity to run a booth at a bridal show and it was certainly a learning experience on how to interact with potential clients. A couple of thoughts I had about the bridal show:
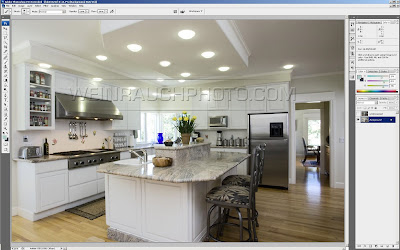
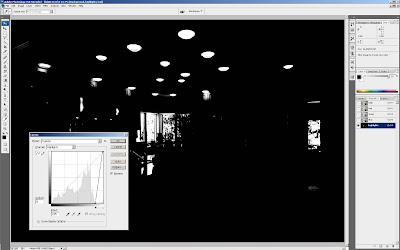
 first step> open up underexposed image and add it to your other image (you can use shift as you drag the image over and it will place it perfectly on top of the other image)> go back to the fist layer with the good exposure and grab the highlights using the above shortcut - Ctrl-Alt-tilda>
 ctrl M(curves dialog box)> this is were I clip the highlights and shadows so it has the the exact selection I need>
  click on add vectors mask ad the botttom of that panel> And poof the overexpopsed hightlights are no longer..... and its a perfect mask.
Sunday, April 6, 2008
Where was I.... mmm cameras....
So I thought I would use this week to tell you some of my equipment that I use and if it was worth every penny(or at least a few pennies)....
I use the Canon 5d and the Mark II. These cameras are both amazing but have found there are some huge differences. the biggest ones being limited AF points and reaction time when I click the shutter button on the 5D. I never thought having more AF points would matter, but it does. I don't know how many times I have had my 5d on a tripod and had to manually focus because there wasn't an AF point where I needed one.
The reaction time isn't fast enough for me especially after using the Mark II because getting the decisive moment is so much easier with a faster camera. I almost have to anticipate the moment with the 5d. So if I had more money (don't most of us wish, think of all the gear I could buy *ponders*) I would have bought 2 of the same cameras. Even though they are both Canons they both have a different layout and feel. When I am shooting a wedding and switching between cameras, it takes a moment to acclimate myself to the camera and even then I will still hit the wrong button during that decisive moment.
On another note: I will have a booth at a Bridal Show on April 12th at the The Chateaux at Fox Meadows.
Photoshop tip:
This is one of the most important tips I can share with you if you print in-house. Before you print any image always add a curves and click on options and set your White and black point. You should always test to see what a papers black and white point are. This way when you print you are printing the most detail you can out of any print.
For example:
If the shadow area is clipping when sent to a printer but there is detail in that area on your monitor, you can set the clipping points in curves, and the detail in the shadow area will then print( image on monitor will look flatter). I iuncluded an image so you can see where this dialog box is.
Thursday, April 3, 2008
Wow, How could I forget...
Printing... Passion... How could I forget? As many of my friends and colleagues can attest, I spend way to much time talking about printing... Above all I spend countless hours printing, so you can count on much writings about my woes and victories over printing.
Of course feel free to ask me any questions pertaining to Photoshop, Photography, printing, or anything in between. I will do my best to get an answer to you.
To view some of my portfolio please visit:
http://www.weinrauchphoto.com/
http://www.weinrauchphotography.com/
PS. Adobe Photoshop Lightroom. 2.0 Beta was just released. Lightroom
My thoughts on Blogs...
I thought long and hard before creating this blog.
How about sharing some of my experience on being a photographer! I continue to learn and grow as a photographer and most of the time feel like a small fish with the wealth of information out there. Hopefully some of my experiences as photographer will help others skip over the mistakes I made.
My other passion is Photoshop, I spend many hours reading books and watching tutorials and from time to time things catch my eye and would love to share this information with others and I thought I could use this blog as way to share my perception of what is important.
I will post once a week on Sunday night.


