So this weekend I had my first opportunity to run a booth at a bridal show and it was certainly a learning experience on how to interact with potential clients. A couple of thoughts I had about the bridal show:
1. Why should they remember me amongst all the other photographers(7 other photography booths)? What can I do to stand out and have them remember when they go home and sift through all the papers from the bridal show...? Can I grab them before they leave my booth?
2. NEVER assume you understand the client that is walking by you. Clients are smart!
3. When showing albums always have them open. Potential clients will not open a album if its closed.
4. Don't be deceptive. People just want the truth.
5. Be willing to talk to people, you need to be confident. If you trust yourself your client will trust you. Shy doens't work, people will just walk by you.
These are just a few thoughts. I learned plenty more and still need to learn more, but what a learning experinece....
SO I found that poeple were interested in me doing more photoshop tips.... and since I think I love photoshop almost more than photography we will see what happens!
Photoshop tip:
So I thought I would share a few shortcuts that I use 99% of time I open a file.
I had someone ask me about this shortcut recently:
How can you select just the highlights and then put that selection on a different layer?
PC(I will update this with MAC shortcut also)- Ctrl-Alt-tilda (loads highlight selection) > then Ctrl J (duplicated the layer, in this case since their is a seletion just the selected portion of the image)
You can also select each channel by doing Ctrl-Alt- 1(red) or 2(green) or 3(blue)
I also had unrelated conversation about bringing highlisghts under control when shooting interiors. So I'll show ya a variation of the above trick!
I don't know how many times I shot an interior when I first started a few years ago and couldn't get a perfect exposure on 1 shot. So I would need to do it in 2 or sometimes 3 different exposures and mask them together.
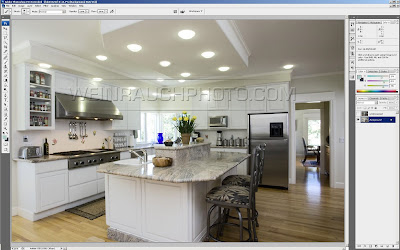
So I shot this interior this last year for a granite company.
 first step> open up underexposed image and add it to your other image (you can use shift as you drag the image over and it will place it perfectly on top of the other image)> go back to the fist layer with the good exposure and grab the highlights using the above shortcut - Ctrl-Alt-tilda>
Ctrl D (deselects highlights)
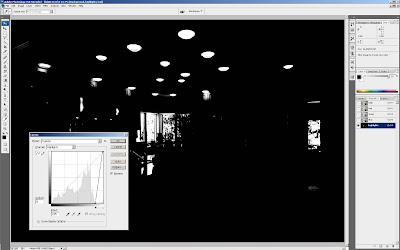
> click on channels panel and you will see your new selection> Click on the newchannel >
 ctrl M(curves dialog box)> this is were I clip the highlights and shadows so it has the the exact selection I need>
 I can then load the selection, ctrl click the layer> go back to your layers panner (don't forget to click on the RGB channel before clicking on the layers panel)> select the layer with underexposed image>
 click on add vectors mask ad the botttom of that panel> And poof the overexpopsed hightlights are no longer..... and its a perfect mask.
Don't forget less is almost always more.
And always email me with clarifications and questions:


No comments:
Post a Comment